Site Info
The Site Info tool allows site allows faculty and administrators to view information about a worksite, which includes its description, the worksite's site owner/creator, the site owner's email address, and other information. A site owner can also use this tool to edit their site setup information and settings, including available site tools and access levels/privileges for different users.
Note: The following options are intended for use by faculty. Remaining tools or options should only be used only by site administrators
Change participant roles
Step 1: Click on [site info] in the menu bar.
Step 2: Scroll down to the Participant List.

Step 3: Change the Participants in one of the following ways.
-
Select the appropriate role from the drop-down menu under Role.
-
To change a participant's status, use the drop-down menu under Status. Note: Making a site participant Inactive makes the course inaccessible to that individual.
-
To remove a participant , check the checkbox next to the participant's name under the Remove column.
Step 4: Click [Update Participants] for the changes to take effect.
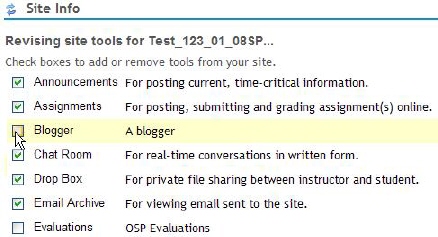
Edit Tools
Edit tools allows you to add or remove tools in your worksite.
Step 1: Click on [site info] in the menu bar
Step 2: Click on [Edit Tools]
Step 3: Check the boxes next to the tools you want to add. Uncheck a box to remove a tool.
Step 4: Click [Continue].
Step 5: Click [Finish] to confirm your edits.
Manage Groups
Manage groups allows you to set up or reconfigure groups within your site.
Step 1: Click on [site info] in the menu bar.
Step 2: Click on [Manage Groups]
Step 3: Click [New].
Step 4: In the Title field, enter a title for your group, e.g., Project team. Enter a description for the group.
Step 5: From the window on the left, select a site member to add to the Group Member List. Then, click [Add to group].
Step 6: To remove a member, select the individual's name in the Group Member List and click [Remove] .
Step 7: When you have finished, click [Update] .
Note: to create another group, click [New] again and repeat the above steps.
Add Participants
The Add participants function allows you to add members to your site.
Step 1: Click on [site info] in the menu bar.
Step 2: Click on [Add Participants]
Step 3: Enter the usernames of the people you want to add to your site.
Note: For participants with Bradley usernames , under "Username(s)", type the participant's username, i.e.) First part of the Bradley Email Id.
For participants without official usernames, under "Guest(s) Email Address (external participants, e.g. jdoe@yahoo.com)", enter their email addresses, one per line.
Step 4: Click [Continue].
Step 5: Choose the roles for the participant(s) you are adding.
If you're assigning the same role to all the participants you're adding, use the radio buttons to select the appropriate role.
Note: The three available roles are instructor, student or TA.
Step 6: Click [Continue].
Step 7: Click [Send Now] or [Don't Send] according to your choice.
Step 8: Click [Continue].
Step 9: Click [Finish].
Import from Site
Sakai allows for the importation of course material from course sites you already.
Step 1: Click on [site info] in the menu bar
Step 2: Click on [Import from Site].
Step 3: Check the box next to the class from which you would like to import materials.
Step 4: Click [Continue].
Step 5: Select the items you would like to import by checking the check box next to the material you would like to add. Step 6: Click [Continue]. The items you checked (e.g. announcements) will be imported into your current site within the appropriate tool-i.e., announcements.
Import Materials from File
You can import classes you have created in Blackboard format.
Step 1: Click on [site info] in the menu bar
Step 2: Click on [Import from File]
Step 3: Click the [Browse] button and browse to where you have saved the file you wish to import.
Note: The file you wish to import must be in Blackboard format and zipped.
You will only be able to import Blackboard course archives using this tool.
Step 4: Click [Import] to finish the process.
Page Order tool
The Page Order tool allows you to reorder your site tools as well as rename, remove, add, and show/hide tools in your site .
Reordering site tools
Step 1: In the menu bar of the site, click [Site info].
Step 2: Click [Page Order].
Step 3: Click on the tool name you wish to move and drag and drop it in the order you wish.
Step 4: Click [Save] once you have the desired tool order or [Cancel] to leave the page and not save any changes.
